Directions and explanations
Lesson 1a
First, to avoid experiencing any difficulty playing the .wav files
within this lesson, go
HERE
for a better understanding of the process required to play these files.
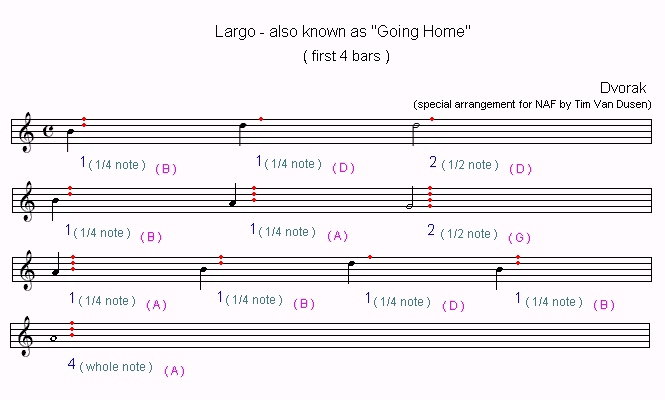
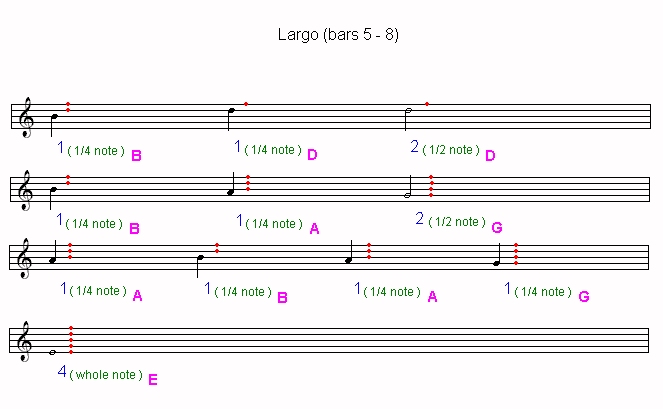
Look at the graphic below and notice that there are 4 groups of 5 lines.
The 5-line grouping is known as a musical "STAFF" and once populated with
notes and other musical symbols, and divided into sections, it becomes a
"MEASURE" or "BAR" in musical terminology. I'll explain more about this
later in the course for those of you who might be interested. Other than
making it easier for me to refer to the particular groupings of notes as
BAR #1, BAR #2, etc., this is not something that you must learn to follow
through this course.
This is how "sheet music" is usually written, except without any
of the stuff that is in a color other than black.
In order to make this readable to someone who has no musical experience,
I've added the colored text and dots.
Think of each line in the "BAR" as representing a hole on your flute.
There are 5 holes on your flute which are represented by the five lines
in each "BAR". The lowest line in the "BAR" represents the hole on your
flute that is furthest from your mouth. If there is a red dot on that line,
then you must cover that hole with your finger. If there is no red dot
then you must leave that hole uncovered. Follow the notes from the very
first one on the very first bar, to the next one on that same bar. Once
you reach the end of the first bar, drop down to the next bar and continue
in the same manner.
Let's take the very first note as an example. Note that there is a red
dot on the very top line and a red dot on the line below that. So,
to create the sound of that note on your flute, you must cover the hole
closest to your mouth, as well as the next hole below that, and blow.
If you print this out and lay it on a flat horizontal surface, it may be
difficult to relate to the correspondence between the red dot on the lines
and the holes in your flute, since your flute is often thought of (in your mind)
as being held somewhat vertical. Therefore, if you print the graphic for
viewing, I would recommend taping it to or supporting it against a vertical
surface when viewing it.
To create music, you also have to know how long to keep blowing the
note. You'll notice that there is a number below each note, in blue.
That number indicates how long to blow that note. The first note indicates
that it gets one "BEAT". To understand that, first you have to establish
a "BEAT" by tapping your foot. Music is most pleasant sounding when the
"BEAT" matches the beat of your heart, especially when you are practicing
by yourself. So, find the beat of your heart by placing your index finger
on the jugular vein in your neck, or on your wrist until you can feel the
beat of your heart. When you do, then practice tapping your foot to that
beat and count groups of 4 beats, like "one, two, three, four, one, two,
three, four, etc". That is the same beat that you'll use when creating
this music.
Okay, back to the blue numbers. If there is a "1" then that indicates that
it gets "1 heartbeat". A "2" indicates "2 heartbeats", and a "4" indicates
"4 heartbeats".
That is all you need to know to get started. The text in green and the text
in pink is just something I've included in case you would like to learn
the actual name of the note and it's "DURATION" as it is known in musical
terminology. Therefore, the first note is a "B" and it's "DURATION" is
concidered to be "1/4". These are two things that you will not need to know
to play the music, but things you may want to learn to advance your understanding
of the music.
Please note that even though this course will be based on a flute in the
key of "E", you can still follow along if you have a flute in another key.
For example in the graphic below, if your flute is in the key of "F#" you
will still cover the same hole represented by the red dots. The difference
is that you will be playing a different note. For example if your flute is
in the key of F#, the first note in the example below, when played on your
flute (with the fingering shown) will be a "C#" rather than a "B". This will
sound perfectly fine as long as you are playing alone, or with another F#
flute or a flute in another key that is compatible with your flute. I'll
discuss more about that later in the lesson. I recommend that if you have
access to a flute in the key of "E" that you use it instead. That will help
you progress more smoothly through the beginning of this course.
Notes shown for flute in key of "E"
back to top
Hear it - partial
(only the part shown here)
File size: 0.8 meg
PART - 2
back to top
Hear it - partial
(only the part shown here)
File size: 0.8 meg
Hear it - complete
(the complete "short" version)
File size: 1.6 meg
Playing a .wav file
Please note that whenever you click on the link to play a .wav file within
this lesson, that it will take a while for the file to be transferred to your
computer. If using certain browsers, a separate little window will open that
will just sit there for a while looking like nothing is happening. However
the data is actually being transferred to your computer in the background
and will eventually start to play. Patience is required, especially for the
larger files which could take 5 minutes or longer to transfer. The smaller
ones usually do so in a couple of minutes depending on the speed of your modem.
Other browsers will ask you if you want to save the file to your computer. If
you answer yes, it will be transferred, and then you can click on the file and
it will play in your computer's media player.
back to top